Setting up for FPGA development on the Analogue Pocket

Introduction, tools
This is a guide on how to get setup for FPGA development on the Analogue Pocket. It takes you through setting up with a brand new Linux installation and a brand new Analogue Pocket, to writing your own Verilog code and running it as an official openFPGA core on the Analogue Pocket. The reference documentation is the Analogue Developer Docs website.
Things you’ll need:
-
Analogue Pocket with micro SD card
-
Torx T6 bit
-
Intel/Altera approved JTAG programmer, often called a “Byte Blaster”. The model I used specifically is the P0302 “USB BLASTER CABLE”, available on Digikey.
Overview
Here’s the rough sequence of steps:
- Setup Quartus (the FPGA “IDE” if you will)
- “Compile” example core
- Install example core on device, via SD card
Hardware setup
Unscrew the 6 screws on the back of the Analogue Pocket. On the bottom left, next to the USB-c port, is the JTAG header.
Here’s a picture of how to connect it – the photo is of a dev kit that has a removable door, obviously yours won’t have that:

Quartus setup
Before we even install Quartus, we’re going to get our USB byte blaster setup.
We’ll need this setup to be able to JTAG program our Analogue Pocket – even though JTAG programming isn’t going to be covered in this tutorial, since we’ll be installing our core via the microSD card, but it is good to do anyways.
To get our byte blaster to work, we’ll need to first install udev rules so that later, Quartus will have the permissions it needs to interface with the byte blaster.
Create a file called 50-intel-altera-usb-byte-blaster.rules with the contents below:
# Taken from here: https://stackoverflow.com/questions/18704913/unable-to-lock-chain-insufficient-port-permissions
SUBSYSTEM=="usb", ATTR{idVendor}=="09fb", ATTR{idProduct}=="6001", MODE="0666"
SUBSYSTEM=="usb", ATTR{idVendor}=="09fb", ATTR{idProduct}=="6002", MODE="0666"
SUBSYSTEM=="usb", ATTR{idVendor}=="09fb", ATTR{idProduct}=="6003", MODE="0666"
SUBSYSTEM=="usb", ATTR{idVendor}=="09fb", ATTR{idProduct}=="6010", MODE="0666"
SUBSYSTEM=="usb", ATTR{idVendor}=="09fb", ATTR{idProduct}=="6810", MODE="0666"
Save it, then copy it to the rules folder:
sudo cp -v 50-intel-altera-usb-byte-blaster.rules /etc/udev/rules.d
Then reload the udev rules:
sudo udevadm control --reload
and connect your byte blaster.
Next step is to actually setup Quartus. Download Intel Quartus Prime Lite (the free version!) from the Intel website: https://www.intel.com/content/www/us/en/software-kit/795187/intel-quartus-prime-lite-edition-design-software-version-23-1-for-linux.html
and begin installing it. During installation there will be a section where you’re prompted to select device support. This basically is Intel asking you: “Which FPGAs do you plan on programming for?”
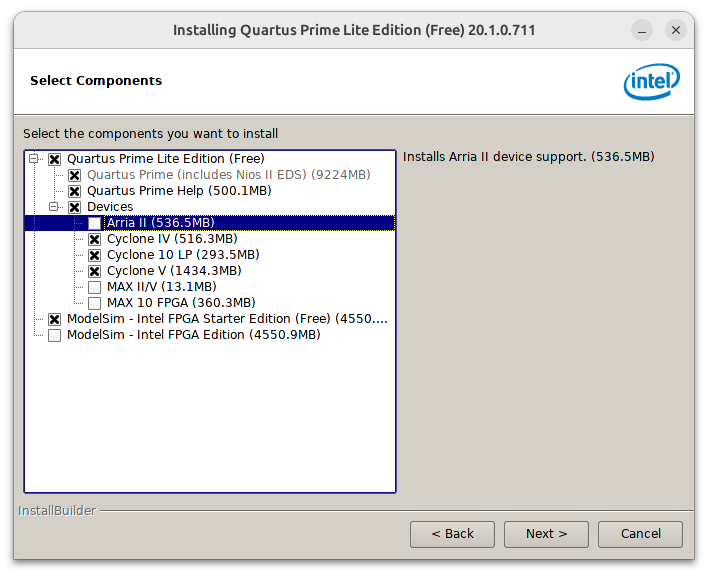
The Analogue Pocket FPGA’s is an Intel Cyclone, so you have to enable support for the Cyclone family of devices:
- Cyclone IV
- Cyclone 10 LP
- Cyclone V
The installation will take a while depending on your download speed. Then, launch Quartus, and go to the Tools -> “Hardware Setup” dialog; we’re going to make sure our Byte Blaster is recognized – specifically you want it to say “USB Blaster” (or whatever your model is) and NOT “Blaster variant” (emphasis on ‘variant’)
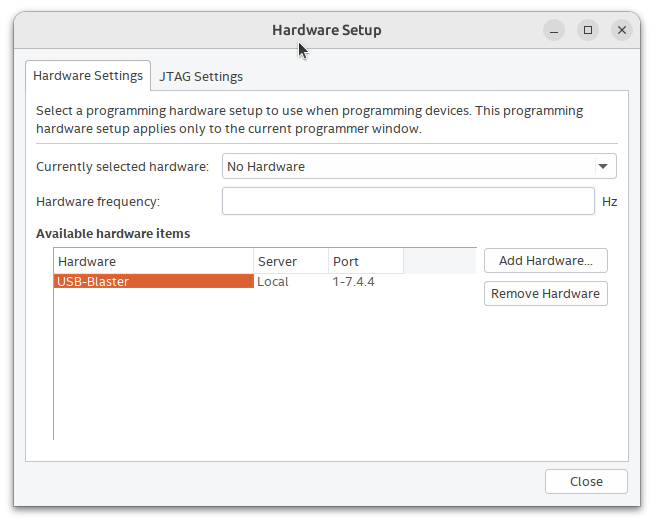
You should see your model of Byte blaster listed. The port refers to the actual USB port (check lsusb, look at the Bus and Device Number) so your port might be different.
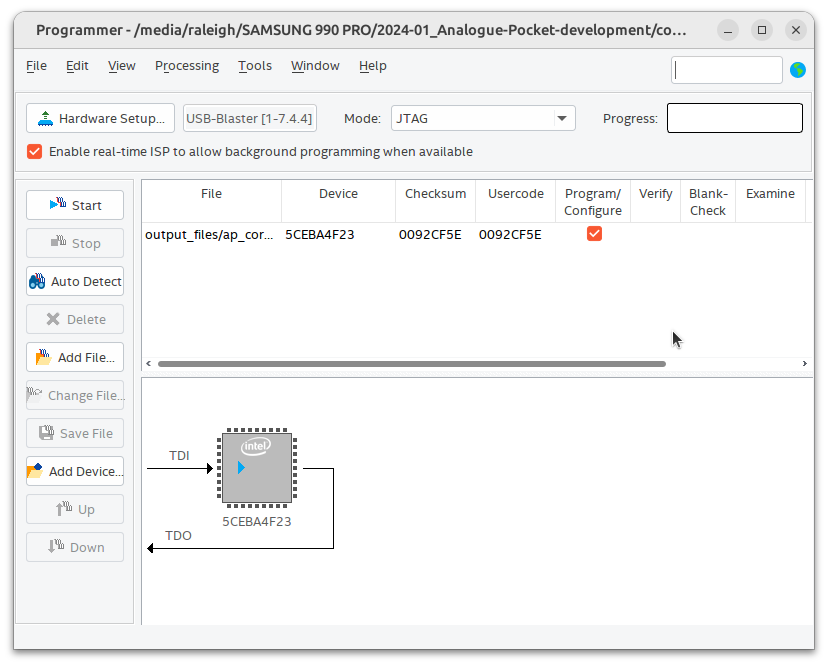
To test this all works, go to Tools -> Programmer, and click “Auto Detect” on the left sidebar.
After a few seconds, you should see a little diagram showing your device with the JTAG signals (Test Data In and Test Data Out) visible:
Building FPGA project
Now that we have Quartus setup, we’re ready to start running code on the device.
Start by cloning this repository, which contains a basic example openFPGA core: https://github.com/open-fpga/core-example-basicassets
This core is going to load a few simple images and audio and render them. We can use our own audio by simply installing our own WAV file into the project’s dist/assets directory (next to the other 2 WAV files).
In the src/fpga directory there is a qpf file, which is a Quartus Project File. Open this file in Quartus and the whole project should be visible to you.
On the left side you’ll see a tasks window. The first task should be to compile your design:

Run through the first 5 tasks, then stop once you get to “EDA Netlist Writer”, we don’t need that step.
This should take a few minutes.
Installing FPGA project
Now, the FPGA side is complete, we’ve created a bitstream file. The next step is going to be just about installing the “executable” (I’m calling it an executable but it’s not technically an executable).
There is one minor hiccup, though. As explained here, the Analogue Pocket FPGA actually requires files to be reversed, byte-for-byte. Why? I don’t know, it just does.
They provide their own C program that you can use to reverse the bitstream file, I’ve pasted it here for convenience:
//
// reverse_bits
// 2022 Developer
//
// LICENSE: This code is public domain.
//

#include <stdio.h>
#include <string.h>
#include <stdint.h>
#include <stdlib.h>

int main(int argc, char* argv[])
{
  uint8_t *buf;
  FILE *fp;
  if (argc != 3){
    printf("\nWrong parameters given\nUsage: reverse_bits [file_in] [file_out]\n");
    return -1;
  }
  fp = fopen(argv[1], "rb");
  if (fp == NULL) {
    printf("Couldn't open the file %s for input\n", argv[1]);
    return -1;
  }
  fseek(fp, 0L, SEEK_END);
  int size = ftell(fp);
  fseek(fp, 0L, SEEK_SET);

  buf = (uint8_t*)malloc(size);
  if (buf == NULL){
    printf("Couldn't malloc file\n");
    return -1;
  }

  uint8_t in;
  for (int i = 0; i < size; i++){
    fread(&in, 1, 1, fp);
    in = ((in & 1) << 7) | ((in & 2) << 5) | ((in & 4) << 3) | ((in & 8) << 1) |
      ((in & 16) >> 1) | ((in & 32) >> 3) | ((in & 64) >> 5) | ((in & 128) >> 7);

    buf[i] = in;
  }
  fclose(fp);

  printf("Reversed %d bytes\n", size);
  fp = fopen(argv[2], "wb");
  if (fp == NULL) {
    printf("Couldn't open the file %s for output\n", argv[2]);
    return -1;
  }
  fwrite(buf, 1, size, fp);
  fclose(fp);

  free(buf);
  printf("Done\n");

  return 0;
}
Compile this program:
gcc -v reverse_bits.c -o reverse_bits
We’ll use it to reverse the RBF file that Quartus built for us.
For this project, the generated file is under src/fpga/output_files. You should see a SOF and JDI file there as well. The SOF file is what we would use if we were installing via JTAG, but for this exercise we only need the RBF since we’re going to install it via the microSD card.
Run the reverse_bits program on our RBF file, like so:
$ ./reverse_bits src/fpga/ap_core.rbf src/fpga/bitstream.rbf_r
Note the _r added to the extension at the end, this lets us know that the file is reversed.
Now, it’s time to package everything up.
Copying onto the micro SD card
This is the crucial step and the easiest to mess up. There’s two terms here, there is the “core” that we’ve been working on – but there is also a “platform”, this what the core runs on.
The good news is that the core example we’re using already has platform files defined for us, under dist/platforms
Copy the ex_platform.json and _images/ex_platform.bin file to the /Platforms directory on your Pocket’s SD card. The Platforms directory is at the root of the SD card device.
Now that you copied the platform files, we’re going to copy the actual core files over.
The files we have to copy are listed below, but knowing where to copy them is the hard part
- audio.json
- core.json
- data.json
- input.json
- interact.json
- variants.json
- video.json
- bitstream.rbf_r
- icon.bin
The directory name for these will depend on the parameters in core.json, specifically the shortname key and the author key.
The format for determining the directory name is <author>.<shortname>
so if your core.json lists “my_core” as the short name, and “obama” as the author, you would put all 9 of your core files under: /Cores/obama.my_core/
Next is our asset files, which in our project, come from dist/assets. These go into the /Assets/<core_name> directory.
Again, the “Assets”, “Core”, and “Platforms” directories should all be at the root/top level.
With everything copied over, we’re now ready to run our example, so eject your device, and continue.
Finally
With the core files and platform files installed, we’re ready to actually run our core. Turn on your Analogue Pocket and choose “OpenFPGA”. You should see your core available to run. Click on it, then click run.
If everything went well, you’ll see something like this:
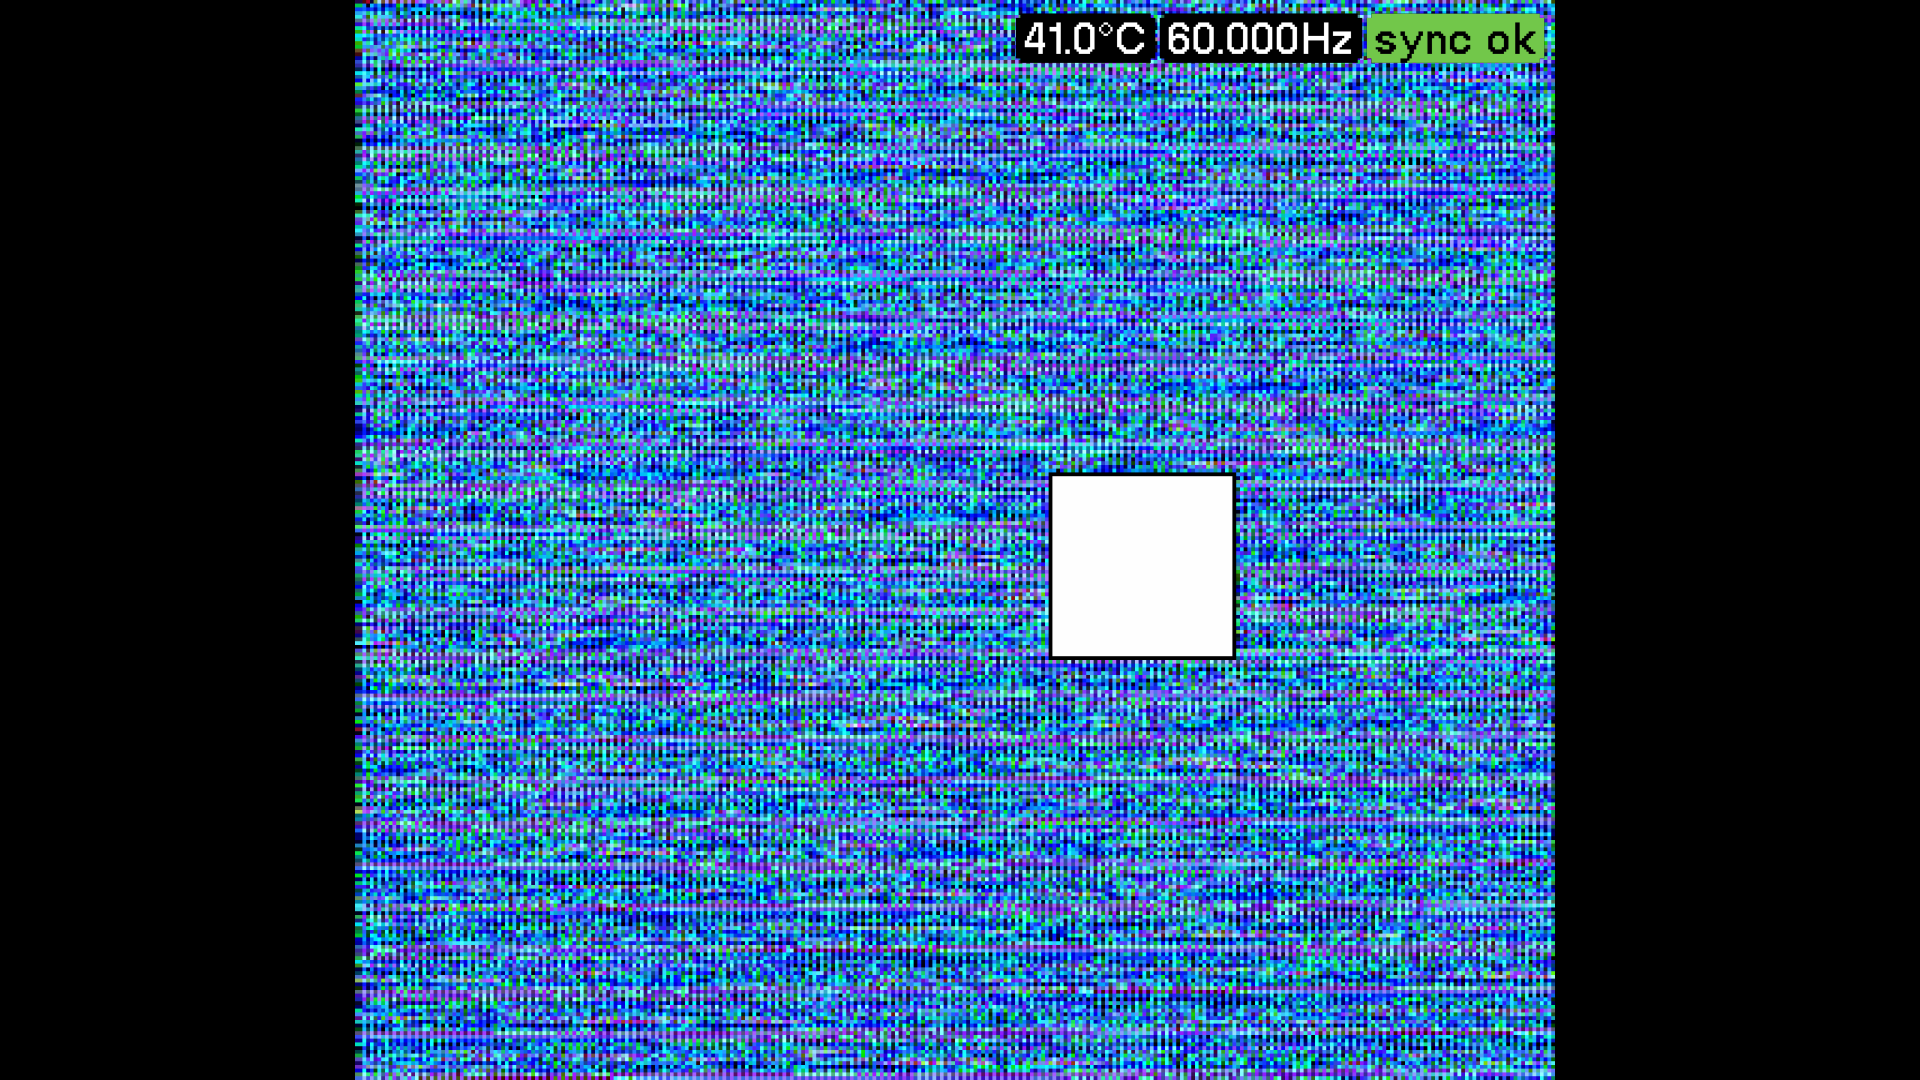
Verify that the core runs as expected:
- the D-pad should move the square
- the A button should change the color of the square to purple
- the B button should change the color of the square to green
- you should hear whatever audio you installed
All good? Then congratulations, you’ve made it.
On the other hand, if you’re trying to troubleshoot why your core isn’t loading.
The most common error I ran into was my core not loading, and instead showing this error:
load error in ‘core’
“General core error”
This can be caused by a few things, but in my case it was because I had placed my core files in the wrong directory – remember the important naming formula from earlier. To check this examine the log files under /System/Logs/
You’ll see the following in them:
Load core normally
Opening /Cores/Example Author.test/core.json
Make sure the directory of the core.json matches exactly what you have.
Leave a comment